Tutorial: From setup to your first pick
Setup tutorial for PickFlow. Choose pickable locations, invite workers, and assign orders to complete your first pick, then set up shelf locations, bundles, tags, and printing.
PickFlow lets your team pick unfulfilled Shopify orders while verifying each item with a smartphone camera. This tutorial covers what a store admin sets up, in order. For what workers see and do, see the Worker guide.
Steps 1 to 5 are all you need to complete your first pick. Shelf locations, bundles, tags, and print content (steps 6 to 9) can wait until your day-to-day operation asks for them.
Two things worth knowing before you start:
- There is nothing to import. Unfulfilled, non-cancelled Shopify orders appear in PickFlow’s order list automatically.
- Workers do not need Shopify staff accounts. They log in to a separate worker app with an invite link you send them.
1. Choose your pickable locations
Open Settings > Pickable Locations. The default is “Pick from all locations.” If you run a single warehouse, leave it as is.
If you run several locations and only want to pick from some of them, choose “Pick from selected locations only,” tick the locations you want, and save.
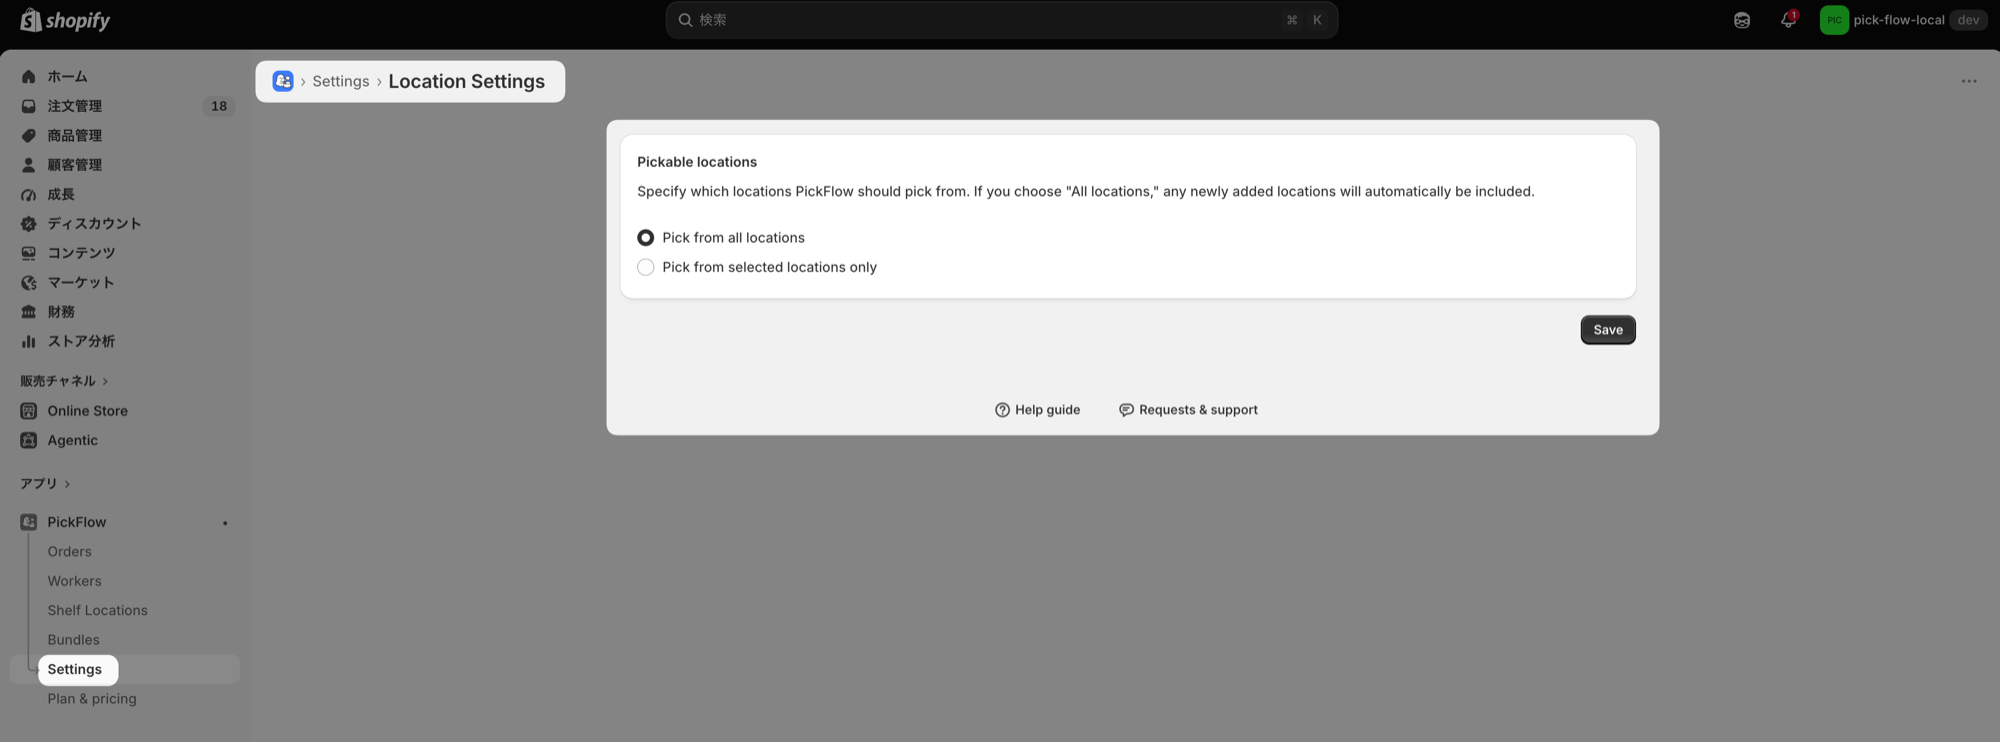
💡 Leaving “Pick from all locations” selected means any location you add to Shopify later is included automatically.
2. Invite a worker
Open Workers > Invite, enter a display name (e.g. alex) and a Worker ID (2 to 20 alphanumeric characters, e.g. alex), then press Invite.
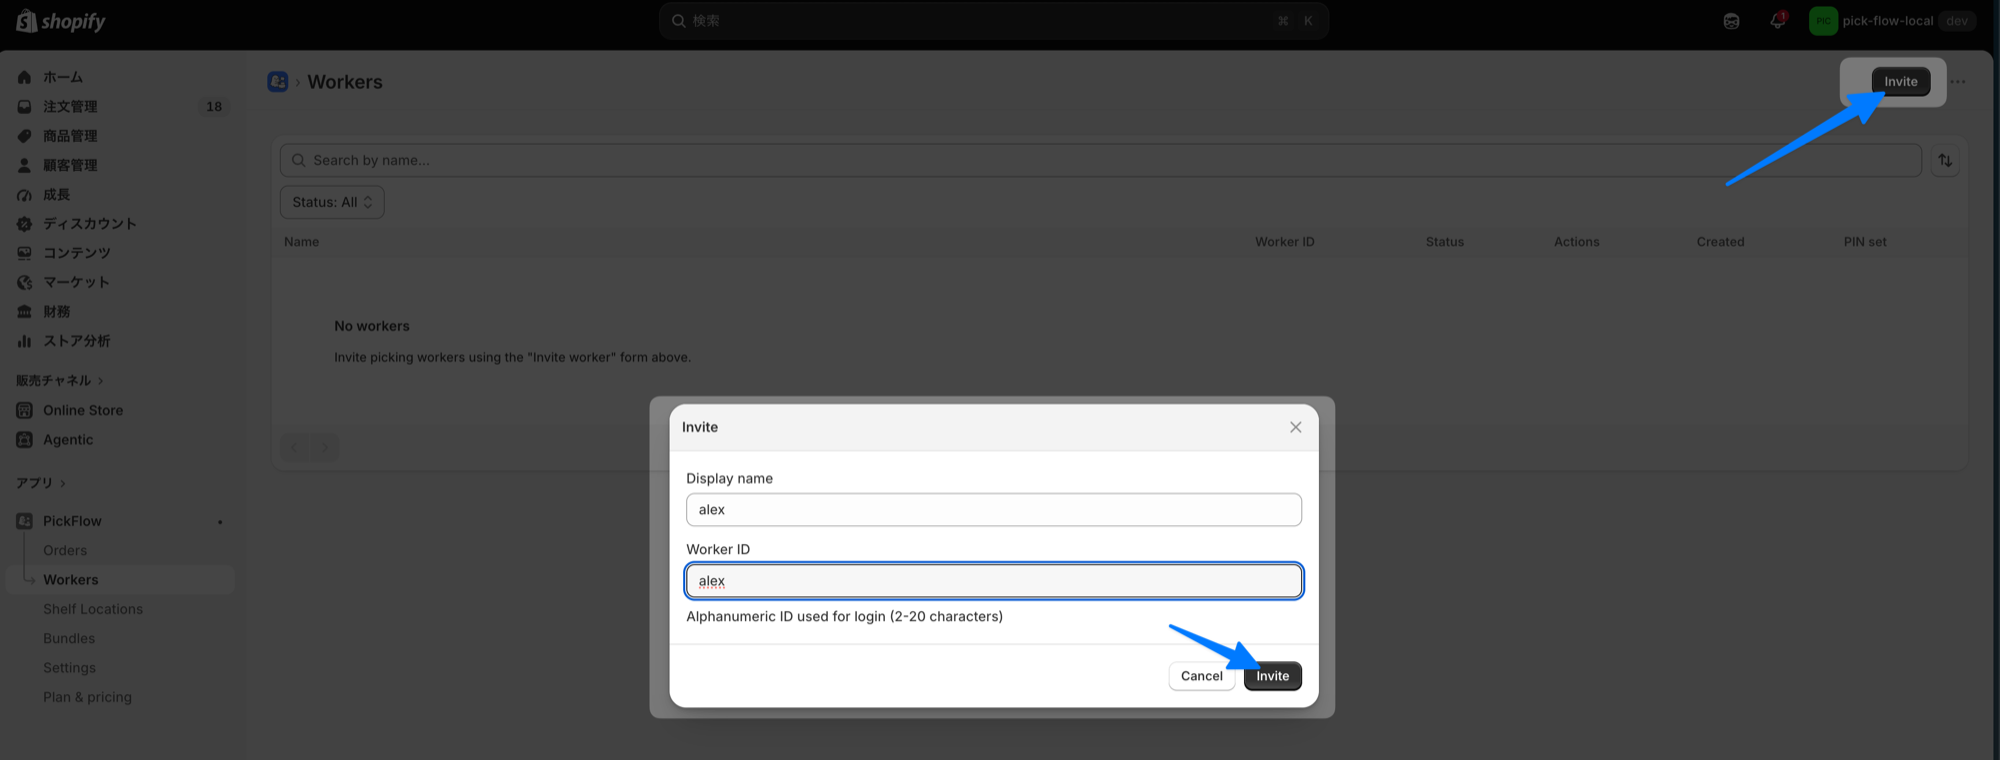
The invite link is copied to your clipboard automatically. Send it to the worker by chat or email. Once they open the link in Chrome on their phone and set an 8-digit PIN, their status changes to Active.
💡 Tell workers to open the link in Chrome on their phone. Links opened inside a chat app’s built-in browser (LINE, Slack, and the like) often cannot start the camera for picking.
💡 The invite link is all you need to send. Workers stay logged in on that phone, so from then on they just open the browser. Only when someone switches phones or clears their browser data do you need to issue a login URL, from Copy app URL in the row’s actions menu.
💡 If an invite link expires, use Reissue link. If a worker forgets their PIN, use Reset PIN. Both are in the same menu.
💡 The Free plan allows up to 2 workers, including pending invites.
3. Assign an order to a worker
Orders lists your unfulfilled orders. Tick the orders you want to assign, then choose a worker from Assign worker in the bar that appears at the top. The steps are the same whether you assign one order or many.
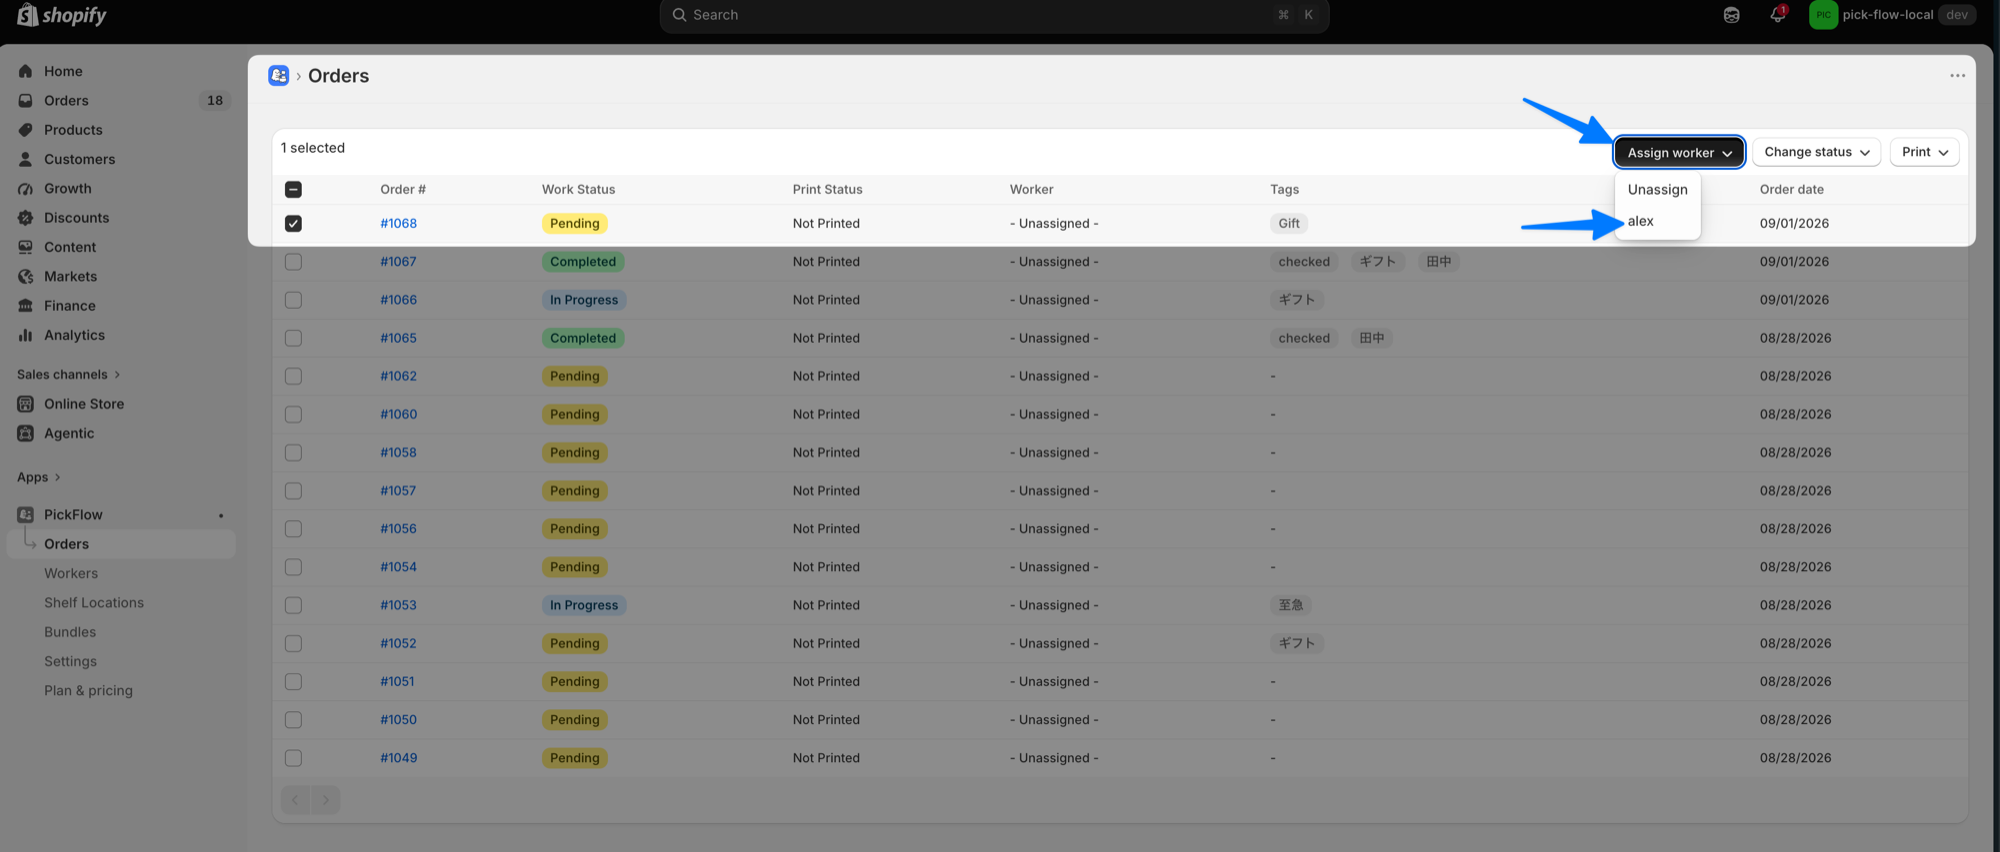
💡 Workers only see orders assigned to them. Until you assign an order, no one can start picking it.
4. Print the picking list
From the same bulk action bar, choose Print and then “Picking list,” “Packing slip,” or “Picking list & Packing slip.” A print view opens; use Print in its toolbar to output.
Working paperless, straight from the phone screen, also works. Skip this step if that suits you.
What goes on the picking list and packing slip is up to you: see Settings > Print Settings. Beyond shelf locations, SKUs, and barcodes, you can also print per-order extras such as gift messages and engraving details. See 9. Adjust what gets printed.
💡 The order is marked as printed, and any tag with the “On first print” timing is applied, the moment the print view opens, not when you press Print in its toolbar. Closing the view without printing still counts as the first print. Opening the same order’s print view again later does not re-apply the tag.
5. Let the worker pick and complete the order
The worker logs in with the link you sent, opens the assigned order, and presses Start Picking. From there they scan each item’s barcode with their phone until every unit is picked.
Share the Worker guide URL with your pickers. It covers everything they need, from logging in to completing a pick.
When a pick completes, three things happen:
- The work status in your order list becomes Completed
- Tags are added to the Shopify order according to your tag settings
- The pick counts toward this month’s completions
That is the whole core flow. Everything below is optional, to set up when your operation needs it.
6. Register shelf locations (optional)
In Shelf Locations, give each product variant a bin label (e.g. A-1-2). Labels appear both in the worker’s picking screen and on printed picking lists, so pickers spend less time hunting for stock.
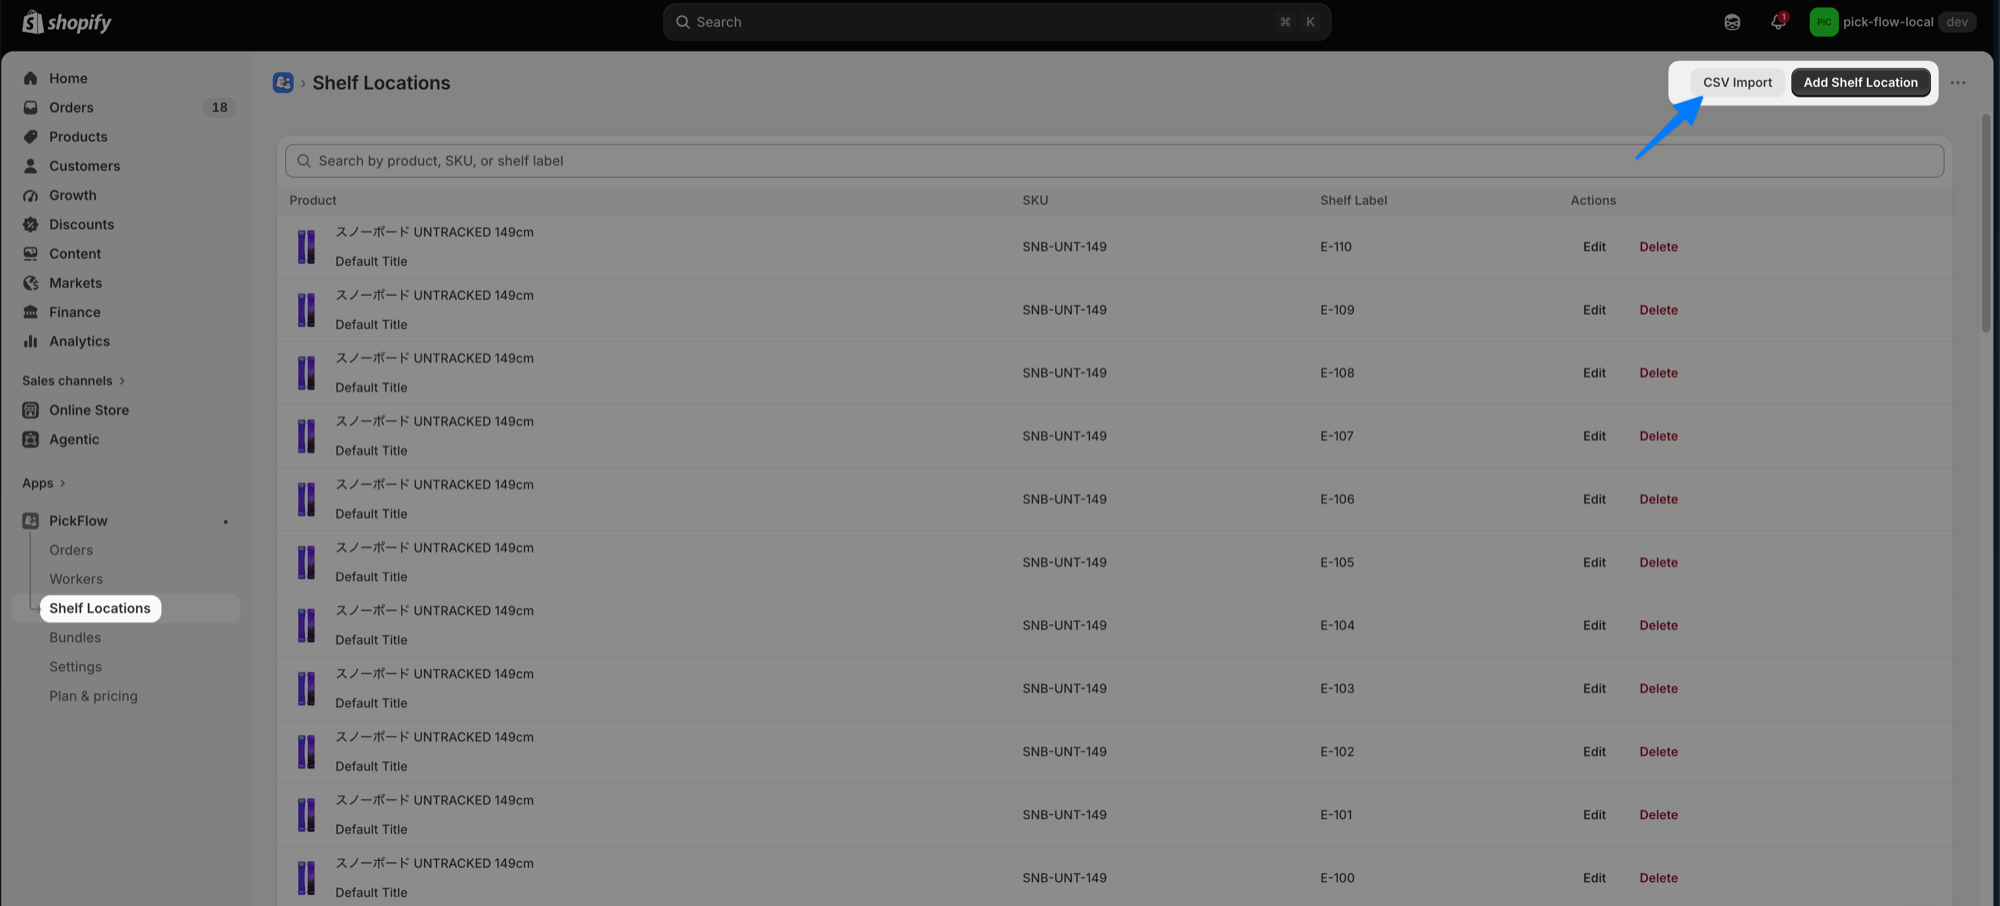
For larger catalogs, use CSV Import. The header row has two columns: the SKU and the shelf label. Both SKU,Label and SKU,棚番ラベル are accepted as headers, and Download sample CSV in the modal gives you a file with the Japanese header. Either one imports the same way.
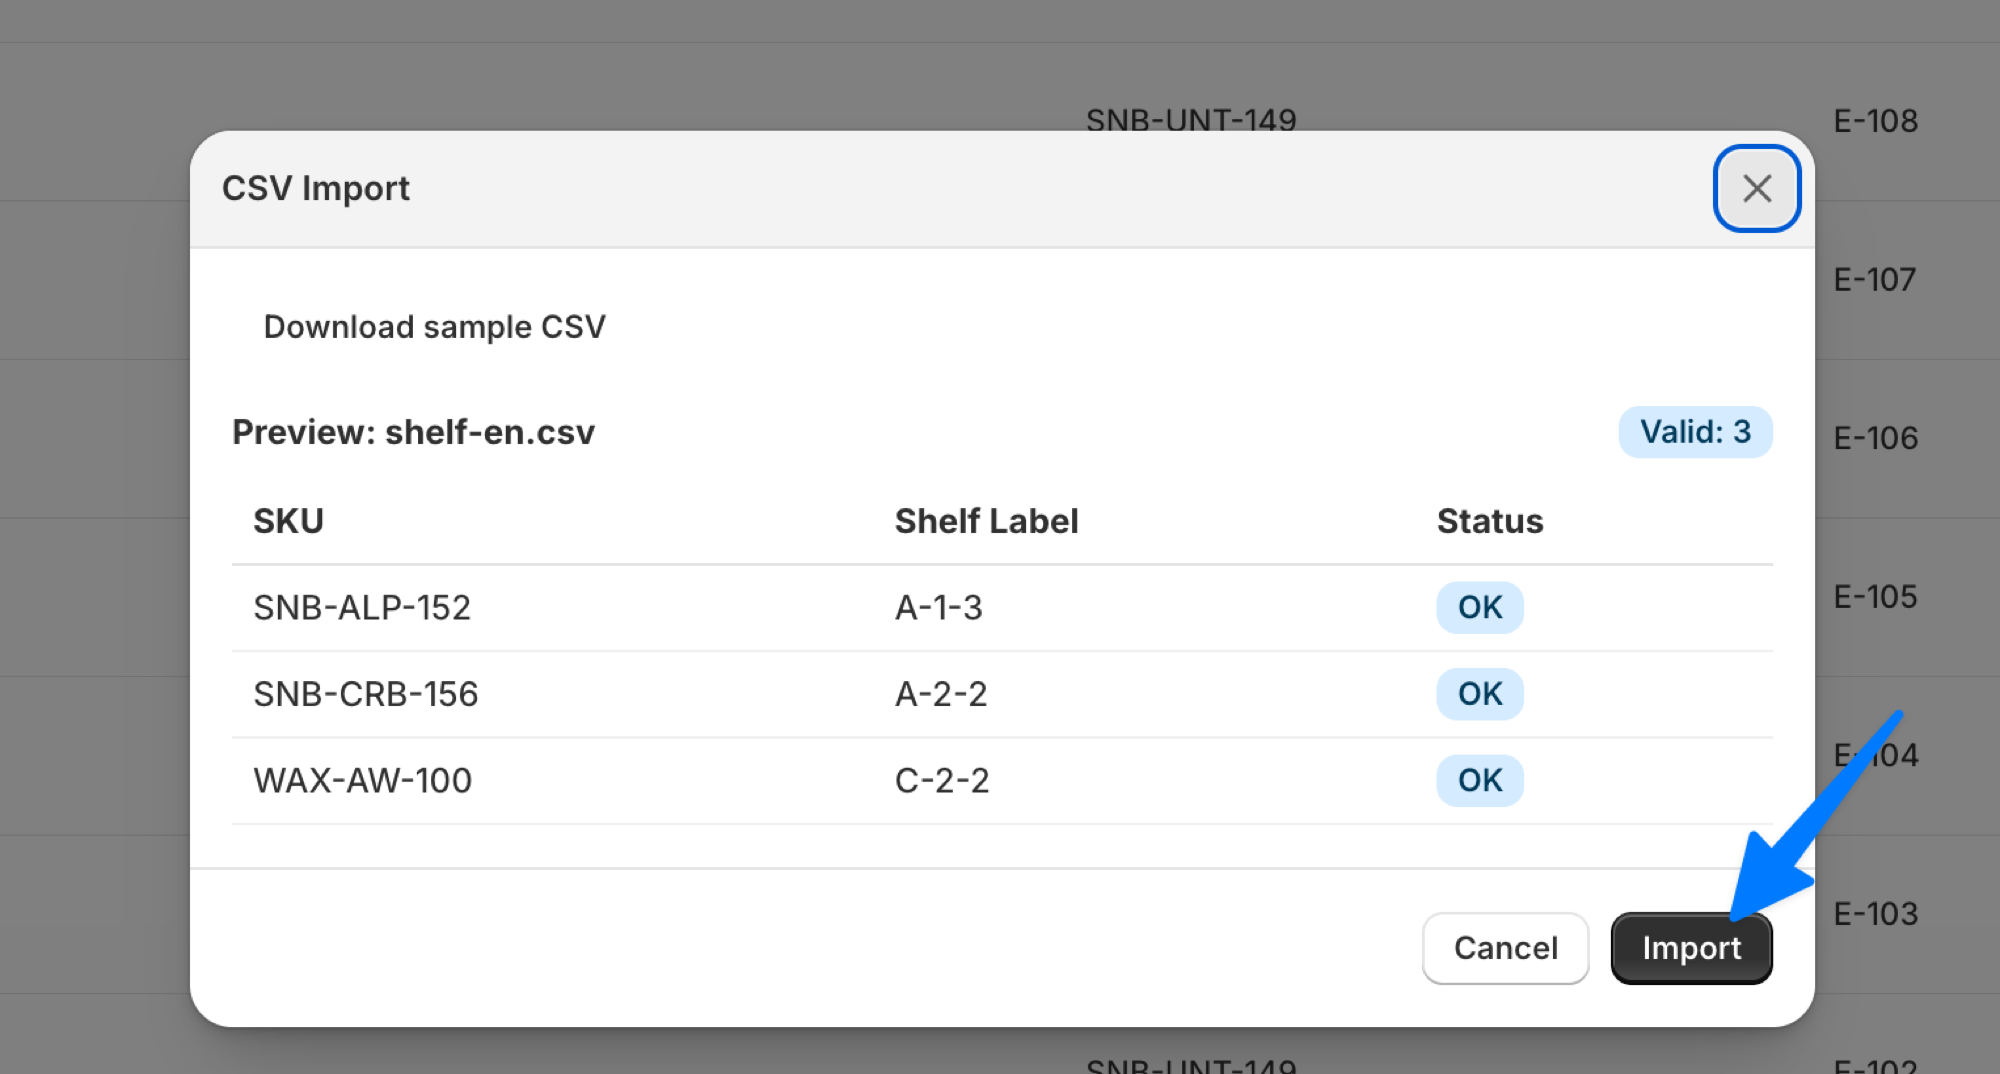
After you pick a file, a preview shows how many rows are valid and how many have errors. Rows whose SKU does not exist in Shopify are flagged and skipped; the rest still import.
💡 A single import handles up to 10,000 rows.
7. Define bundles (optional)
If you sell a set of products under a single SKU, register the parent variant (the bundle product) and its components in Bundles. PickFlow expands the bundle into its components at picking time, so workers scan and verify each item inside.
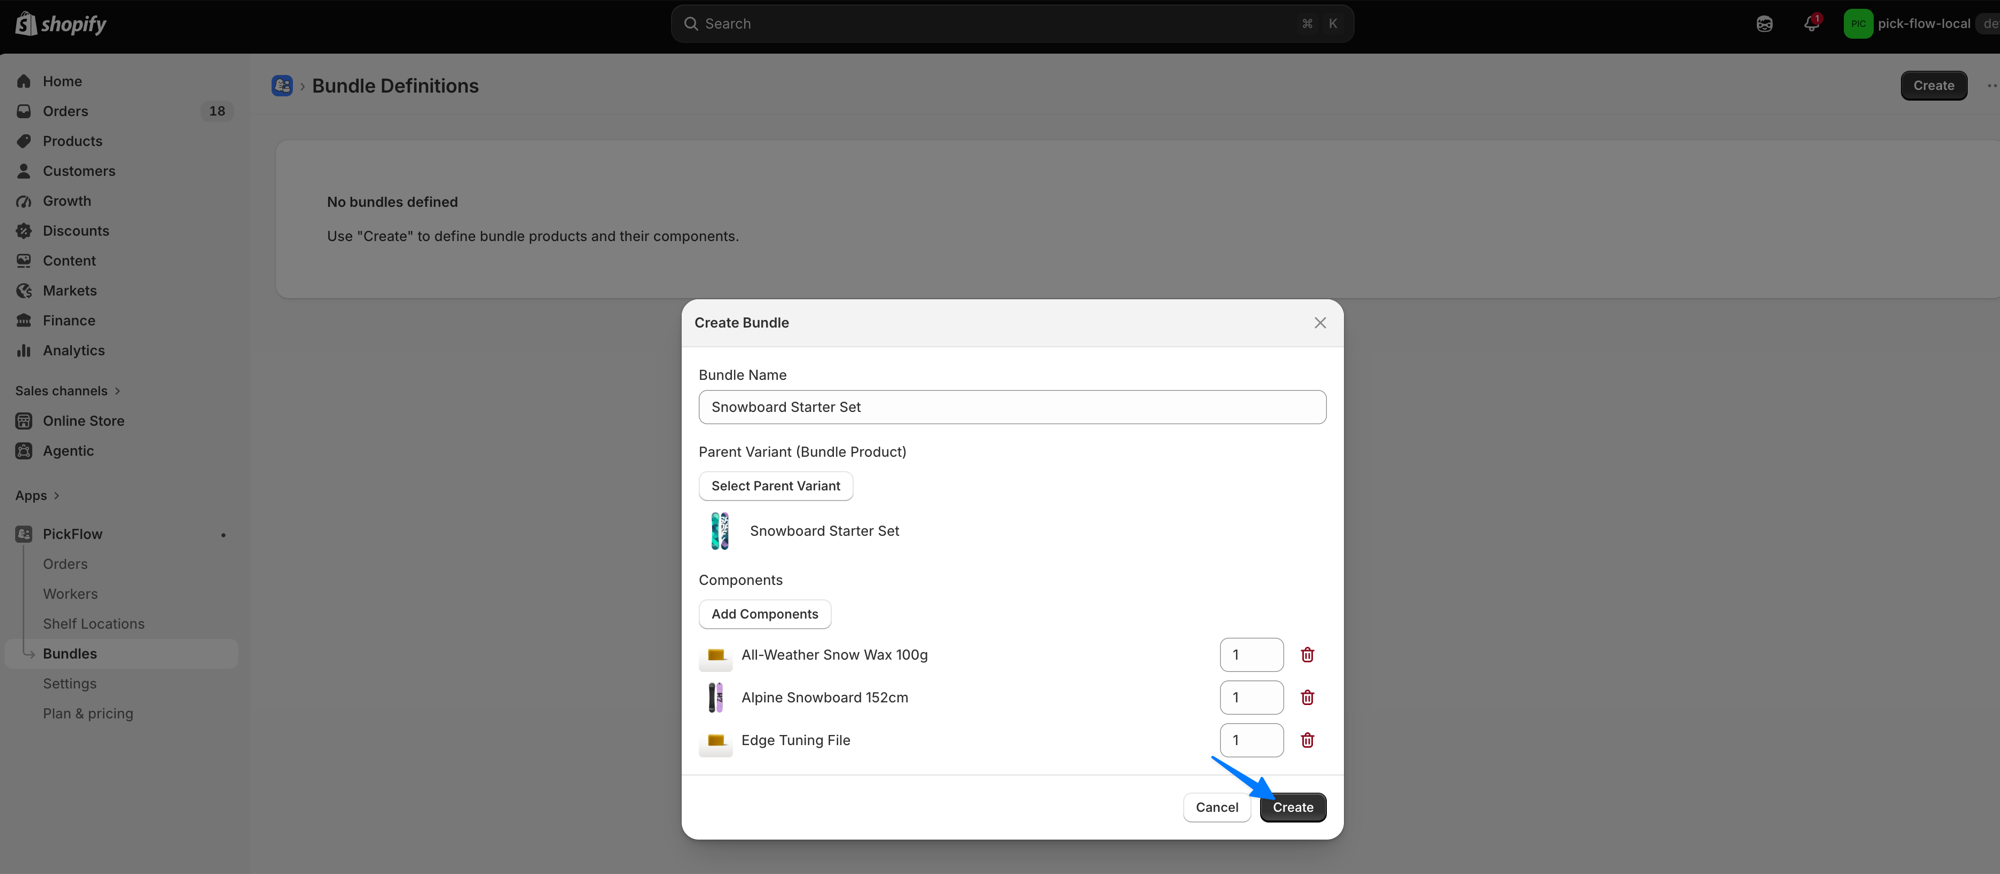
💡 The parent variant cannot be changed after creation. To change it, delete the bundle and create it again.
8. Set up order tags and product tags (optional)
Settings > Tag Settings covers two different kinds of tags.
Order tags are tags PickFlow adds to the Shopify order. Give each one a tag name and a timing (“On picking completion” or “On first print”), and add as many as you need. Turn on Add worker name as tag to also tag the completed order with the display name of the worker who picked it.
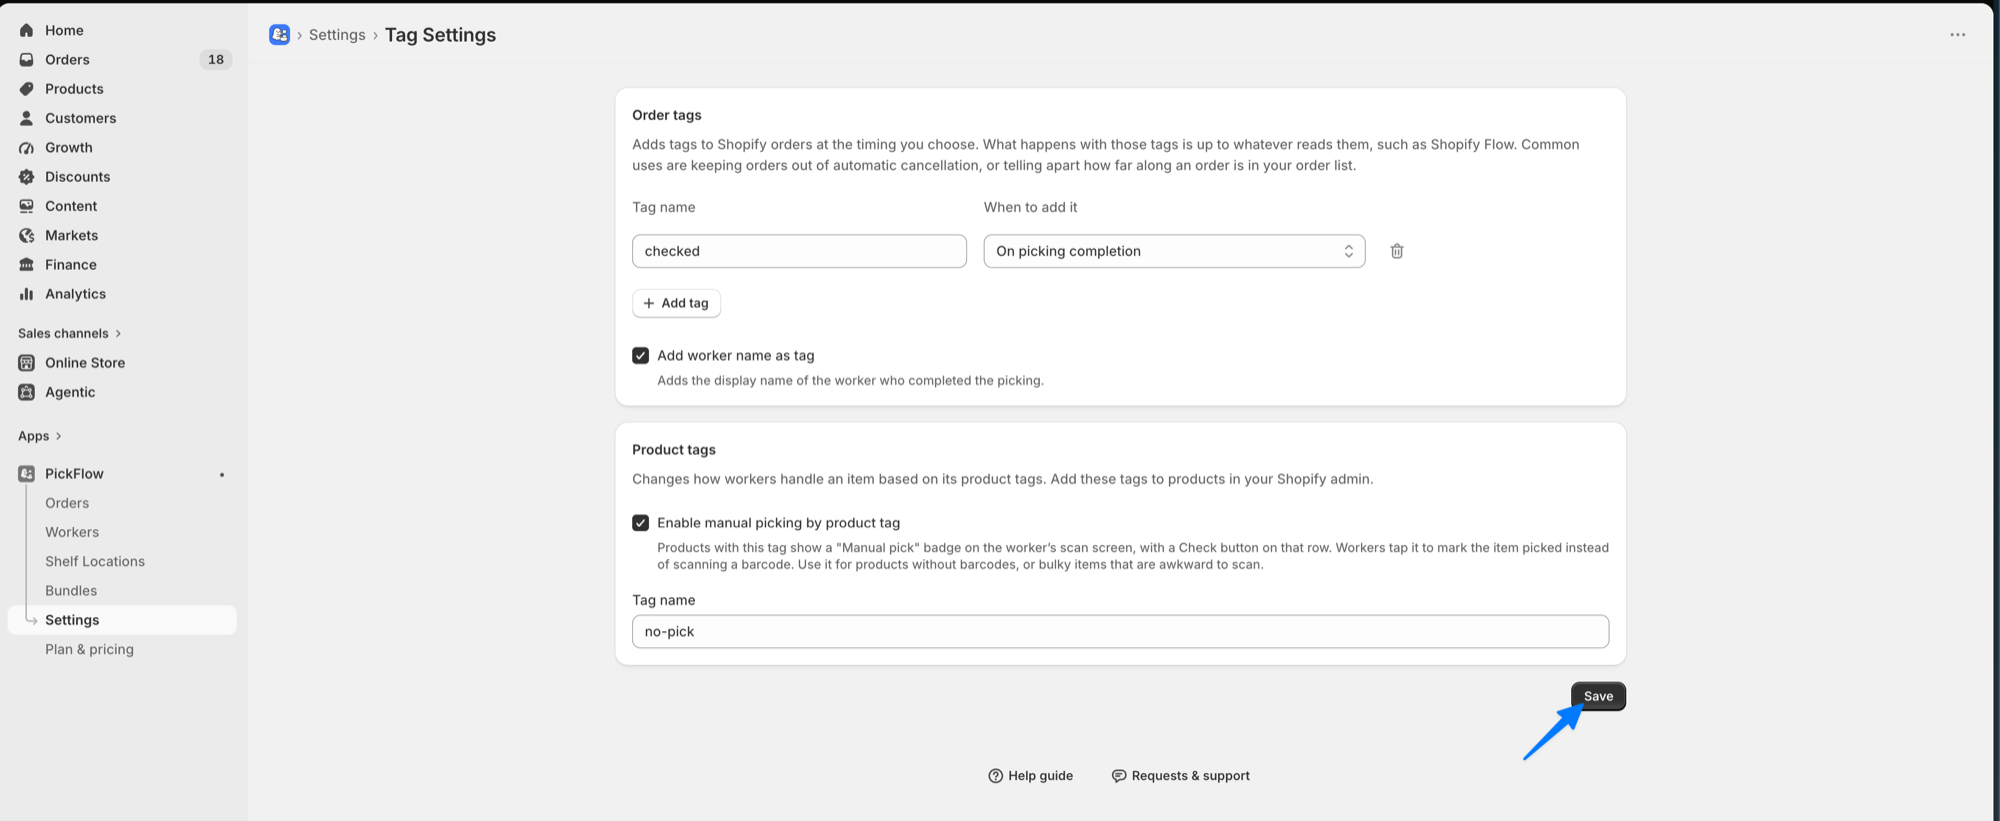
For a first try, add a single row with the tag name picked and the timing “On picking completion.” You can then filter completed orders from your Shopify order list. What happens with those tags is up to whatever reads them, such as Shopify Flow. Common uses are keeping orders out of automatic cancellation, and telling apart how far along an order is.
Product tags change how workers handle an item. Turn on Enable manual picking by product tag and set a tag name: products carrying that tag show a “Manual pick” badge on the worker’s scan screen, and tapping Check on that row marks the item picked. No barcode is needed, so use it for items without barcodes, or bulky items that are awkward to scan. You add the tag itself to products in your Shopify admin.
9. Adjust what gets printed (optional)
Settings > Print Settings opens with two tabs: Picking List Settings and Packing Slip Settings. The two documents serve completely different readers, so you configure them separately. A live preview on the right shows exactly how each one will look.
Picking List Settings
The document your warehouse staff work from.
- Font size: small, standard, or large
- Product information: toggles for product image, SKU, barcode, shelf location, price, currency code, and weight
- Order information: toggles for order number barcode, order date and time, order note, order tags, shipping address, shipping method, and timeline (internal notes)
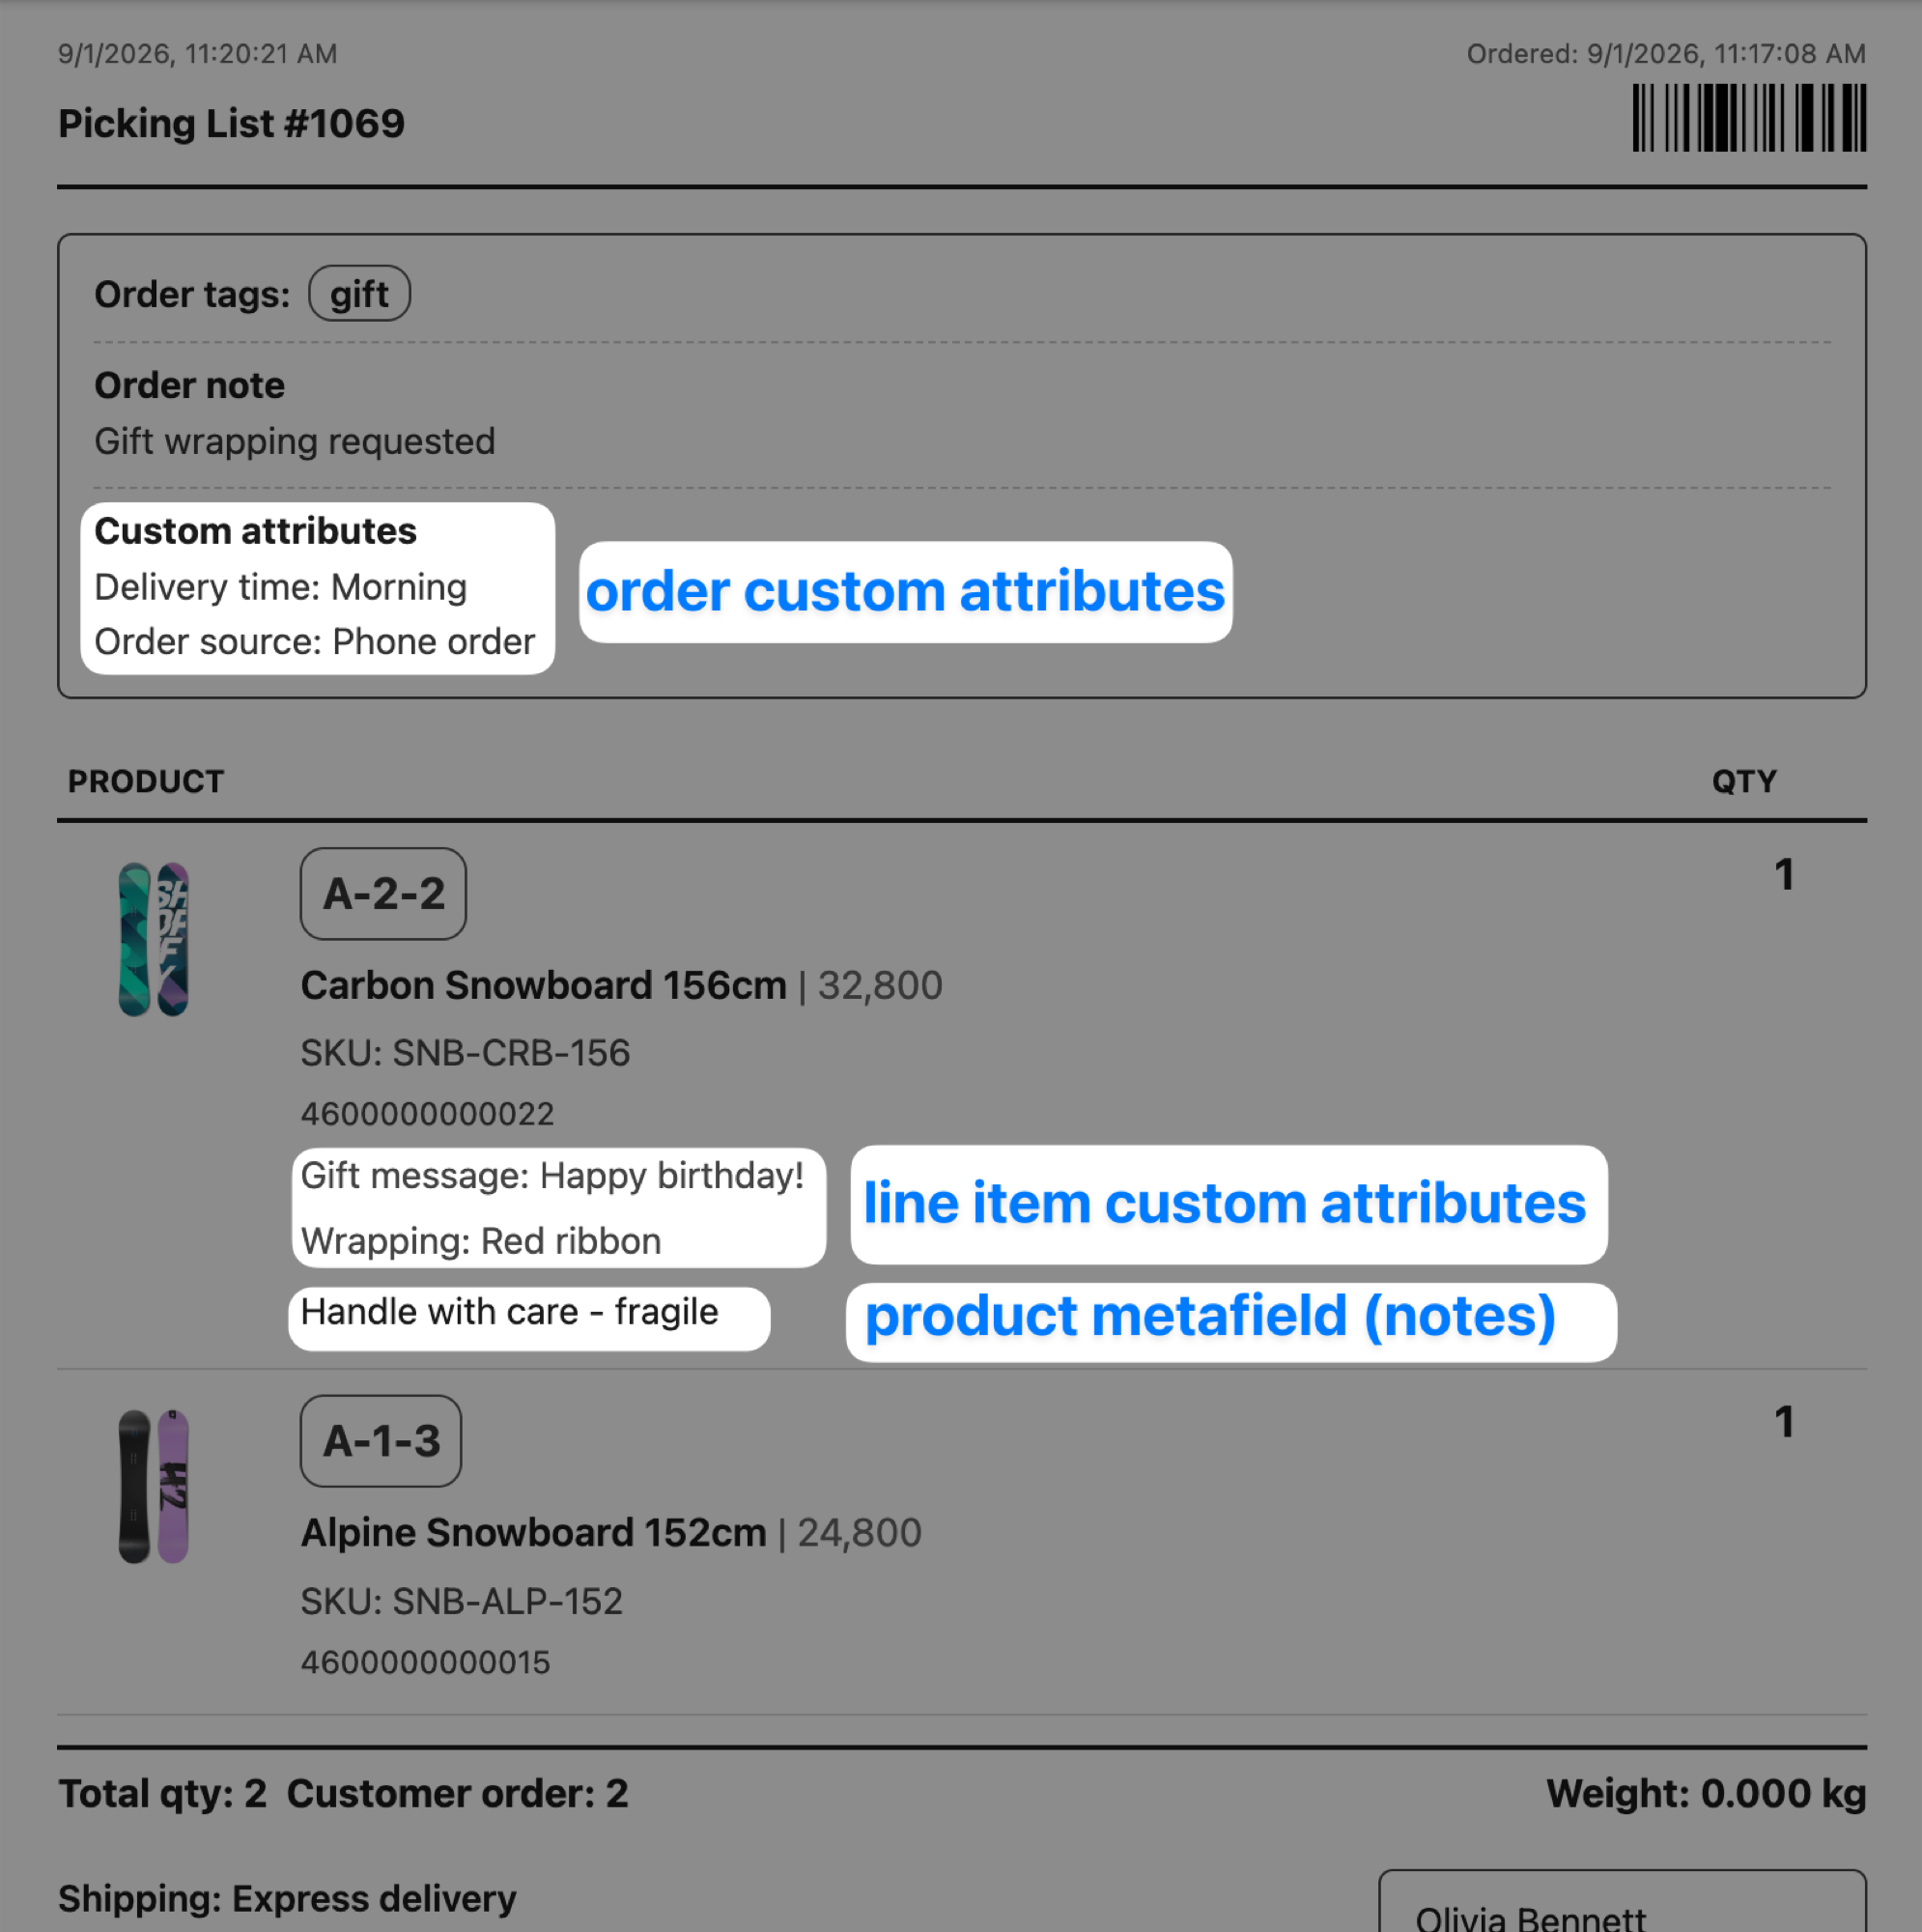
The picking list can also carry extra information attached to the order or the product. These three print on the picking list only, never on the packing slip. The first two change from order to order; the last one is fixed to the product.
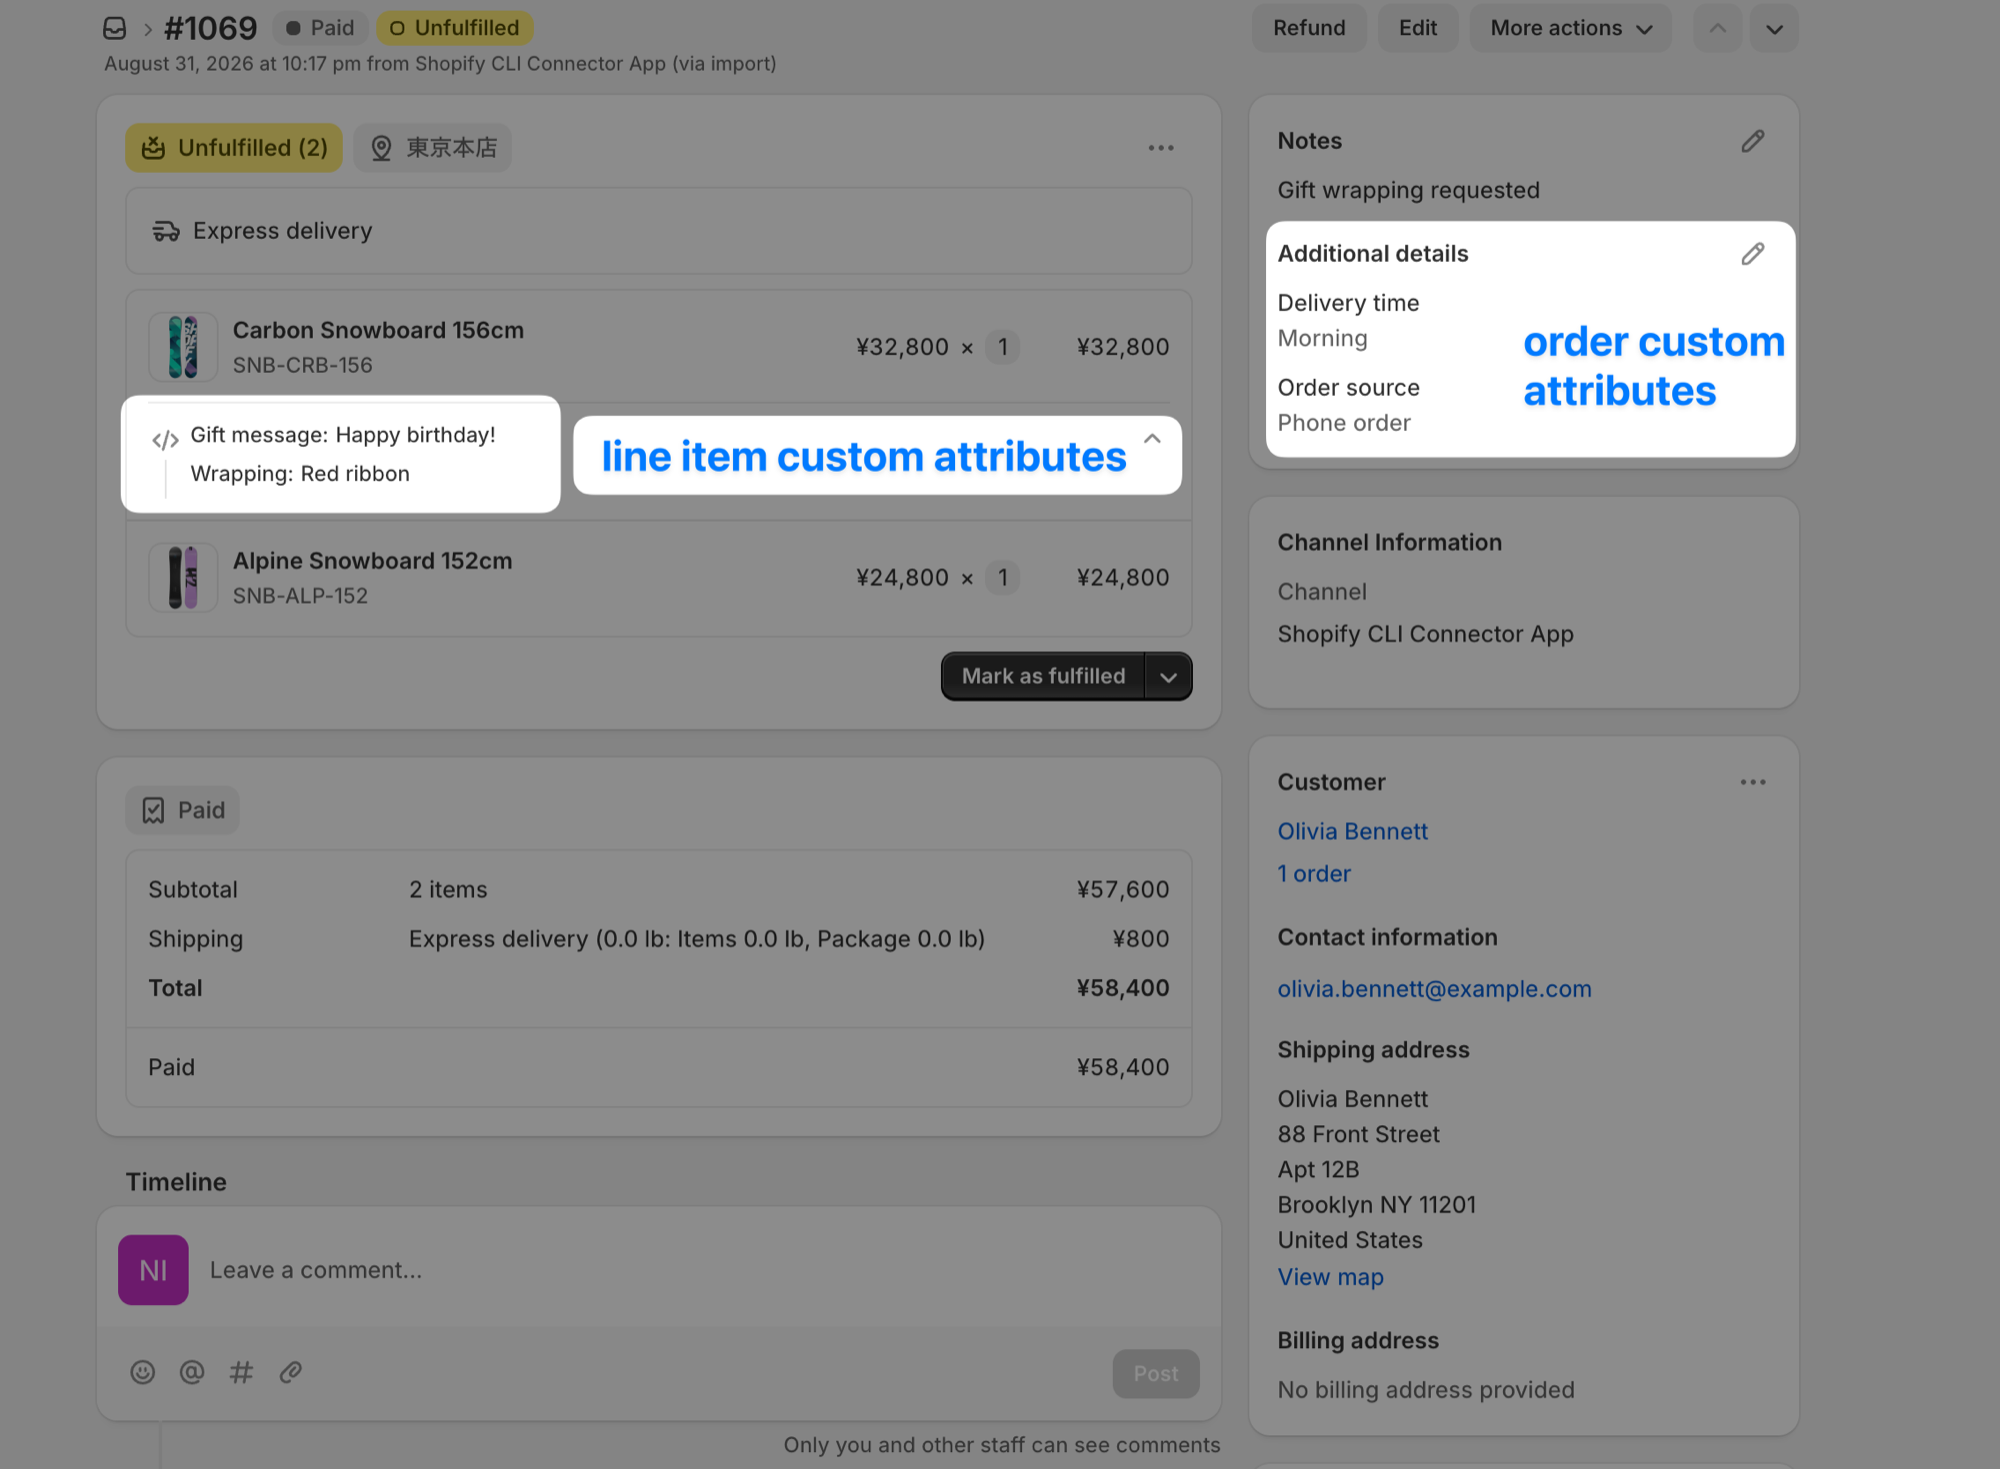
- Order custom attributes: extras attached to the whole order (gift message, requested delivery date, and so on), printed in the order information block. These are the same values Shopify shows under Additional details on the order. Leave “keys to show” empty to print every attribute that has a value, or list keys separated by commas to print only those.
- Line item custom attributes: extras attached to individual products (engraved text, engraving color, and so on), printed on that product’s row. Leave “keys to show” empty to print every property that has a value, or write one entry per line as
key=Labelto print only those keys under labels you choose. Omit the label and the key itself is printed. - Product metafield (special notes): a metafield on the product, printed under that product’s row. It is only fetched when you fill in both Namespace and Key (for example
pickflowandnote). It belongs to the product rather than the variant, so every variant of that product shows the same text. It also prints for bundle components, which makes it a good fit for handling notes such as “Fragile, handle with care.”
All three live under Extra order and product details in the print settings. Tick the ones you want and enter the keys to print.
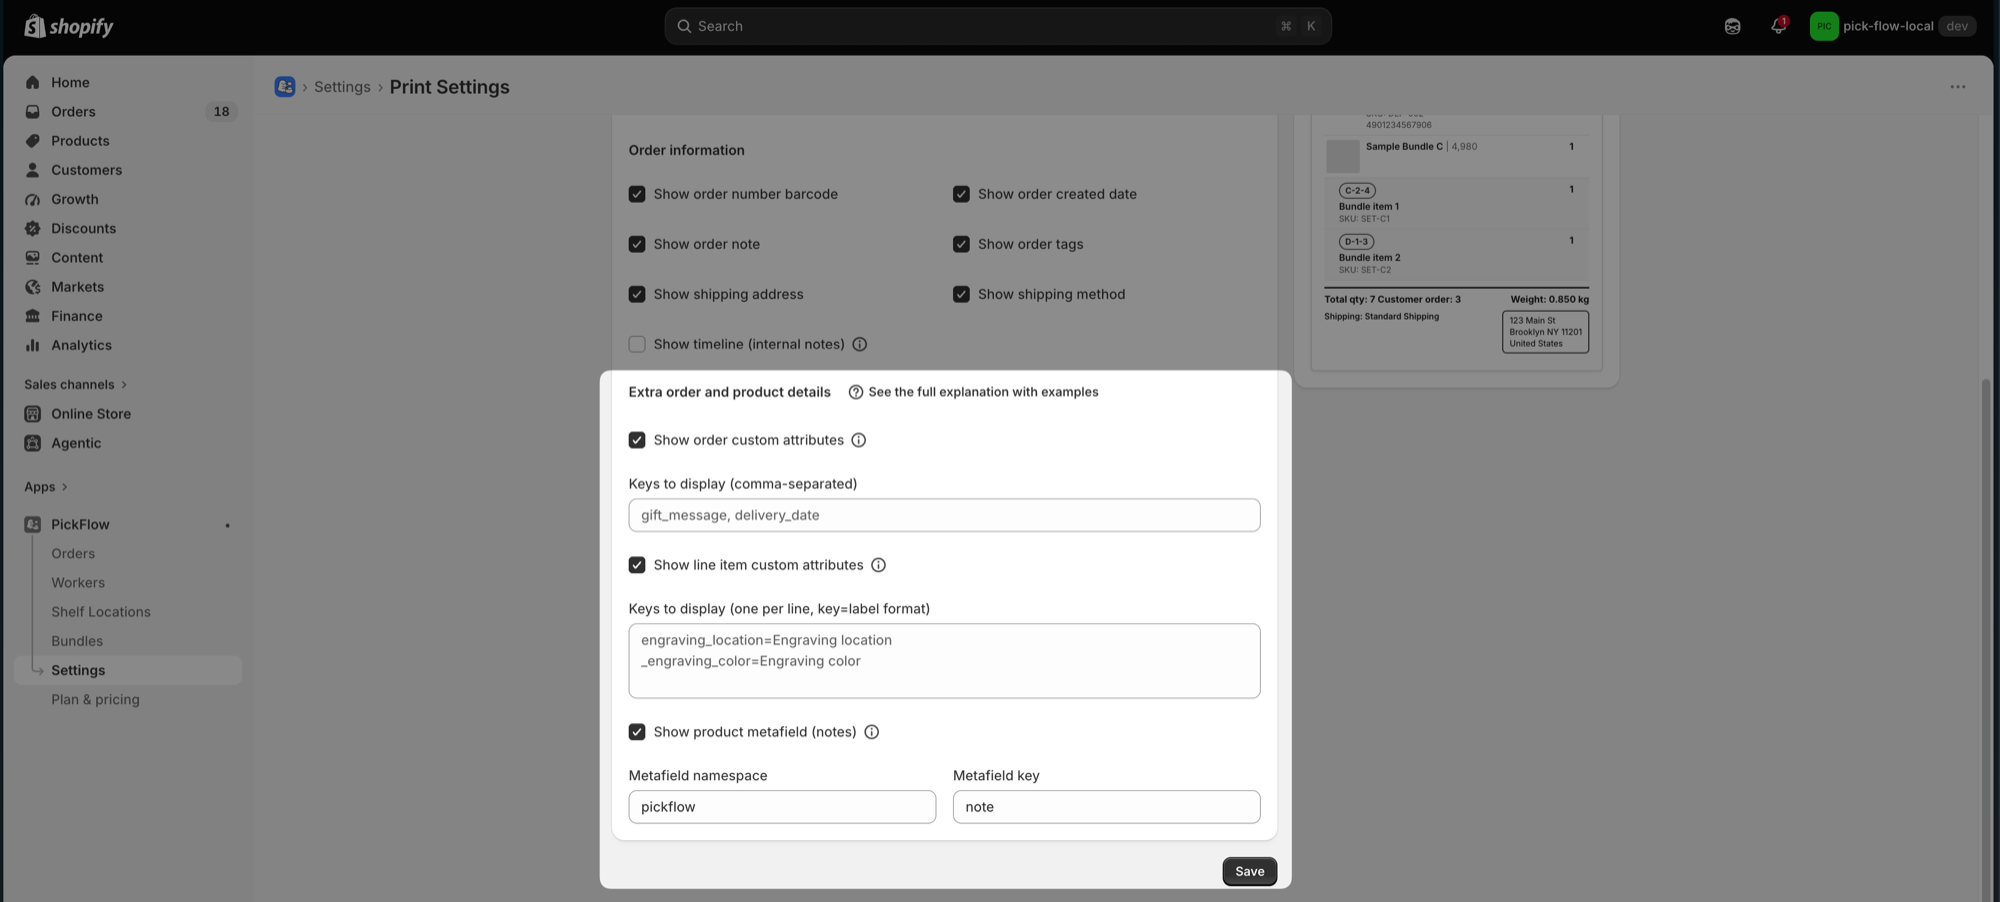
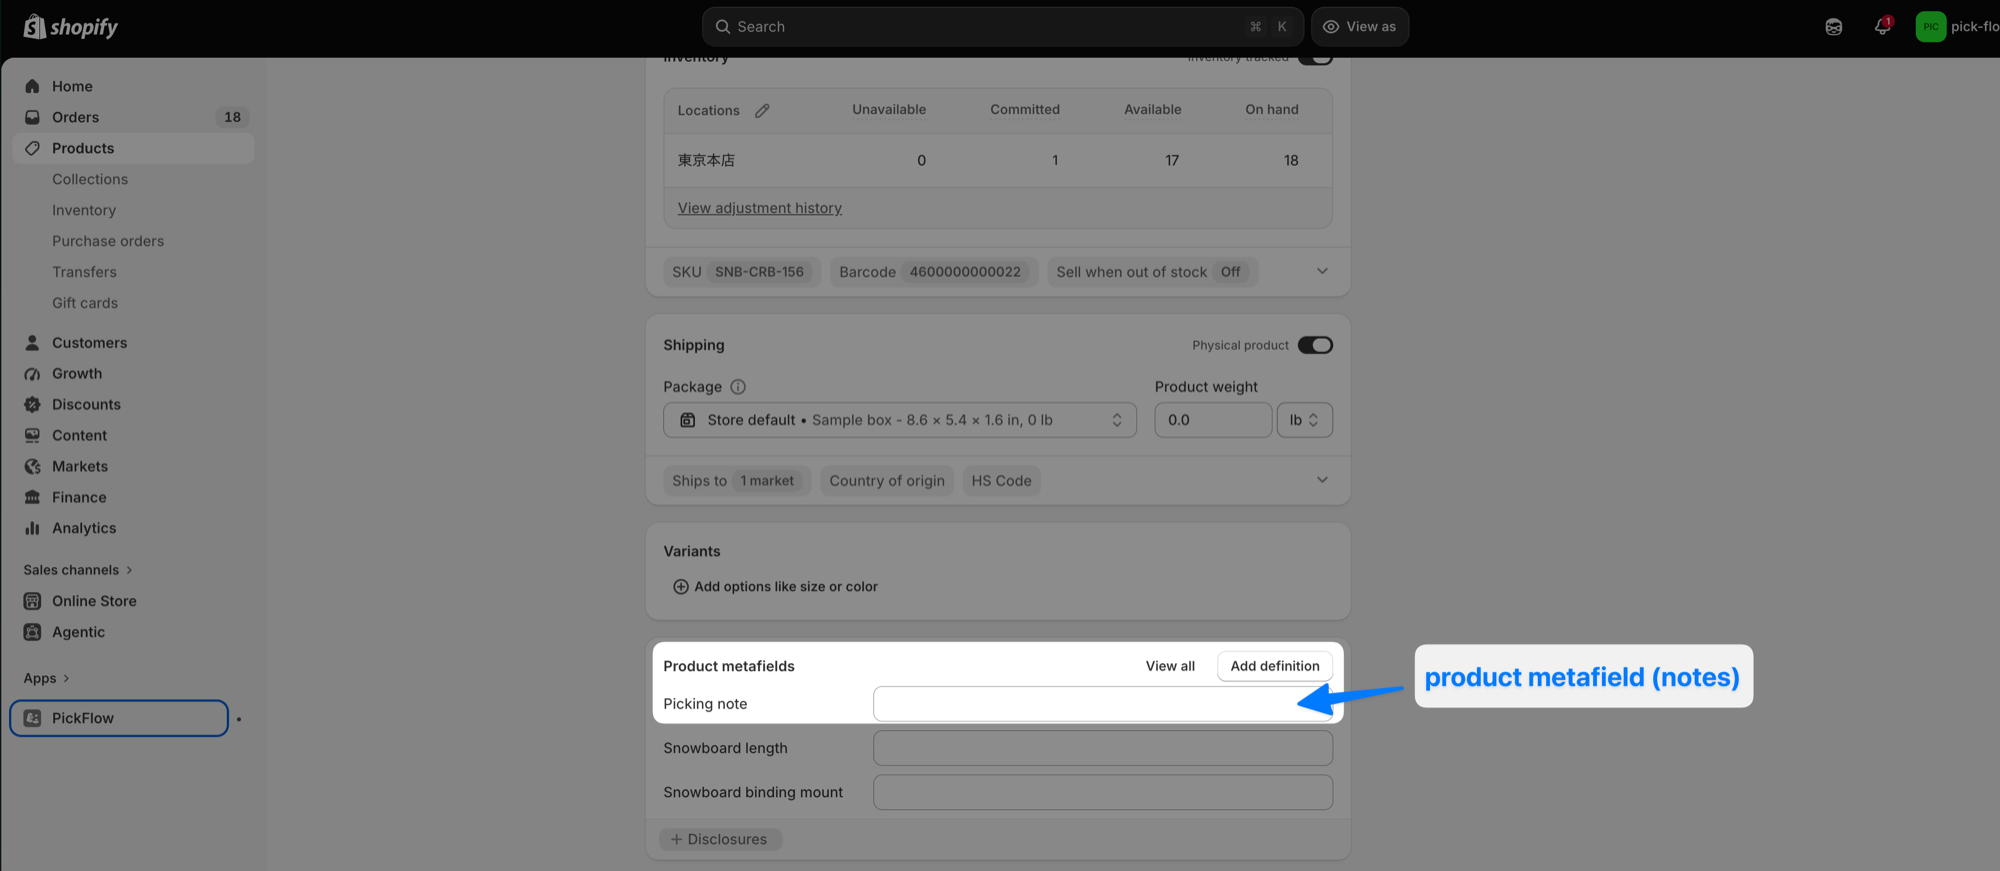
💡 Defining the metafield in Shopify under Settings > Custom data > Products puts the field on every product’s edit page, so you can fill it in per product. It still prints without a definition, but you would have to reach the value through “Show unstructured metafields” on each product, which is not practical.
💡 Either single line text or multi line text works. Line breaks in a multi line value are printed as they are, so it handles a few lines of packing instructions. Rich text is the one type that does not work: its value is stored as JSON, and the raw JSON is what gets printed.
Create the definition under Settings > Custom data > Products. The name is yours to choose; what you type into PickFlow’s print settings is the namespace and key below it (pickflow and note in this example).
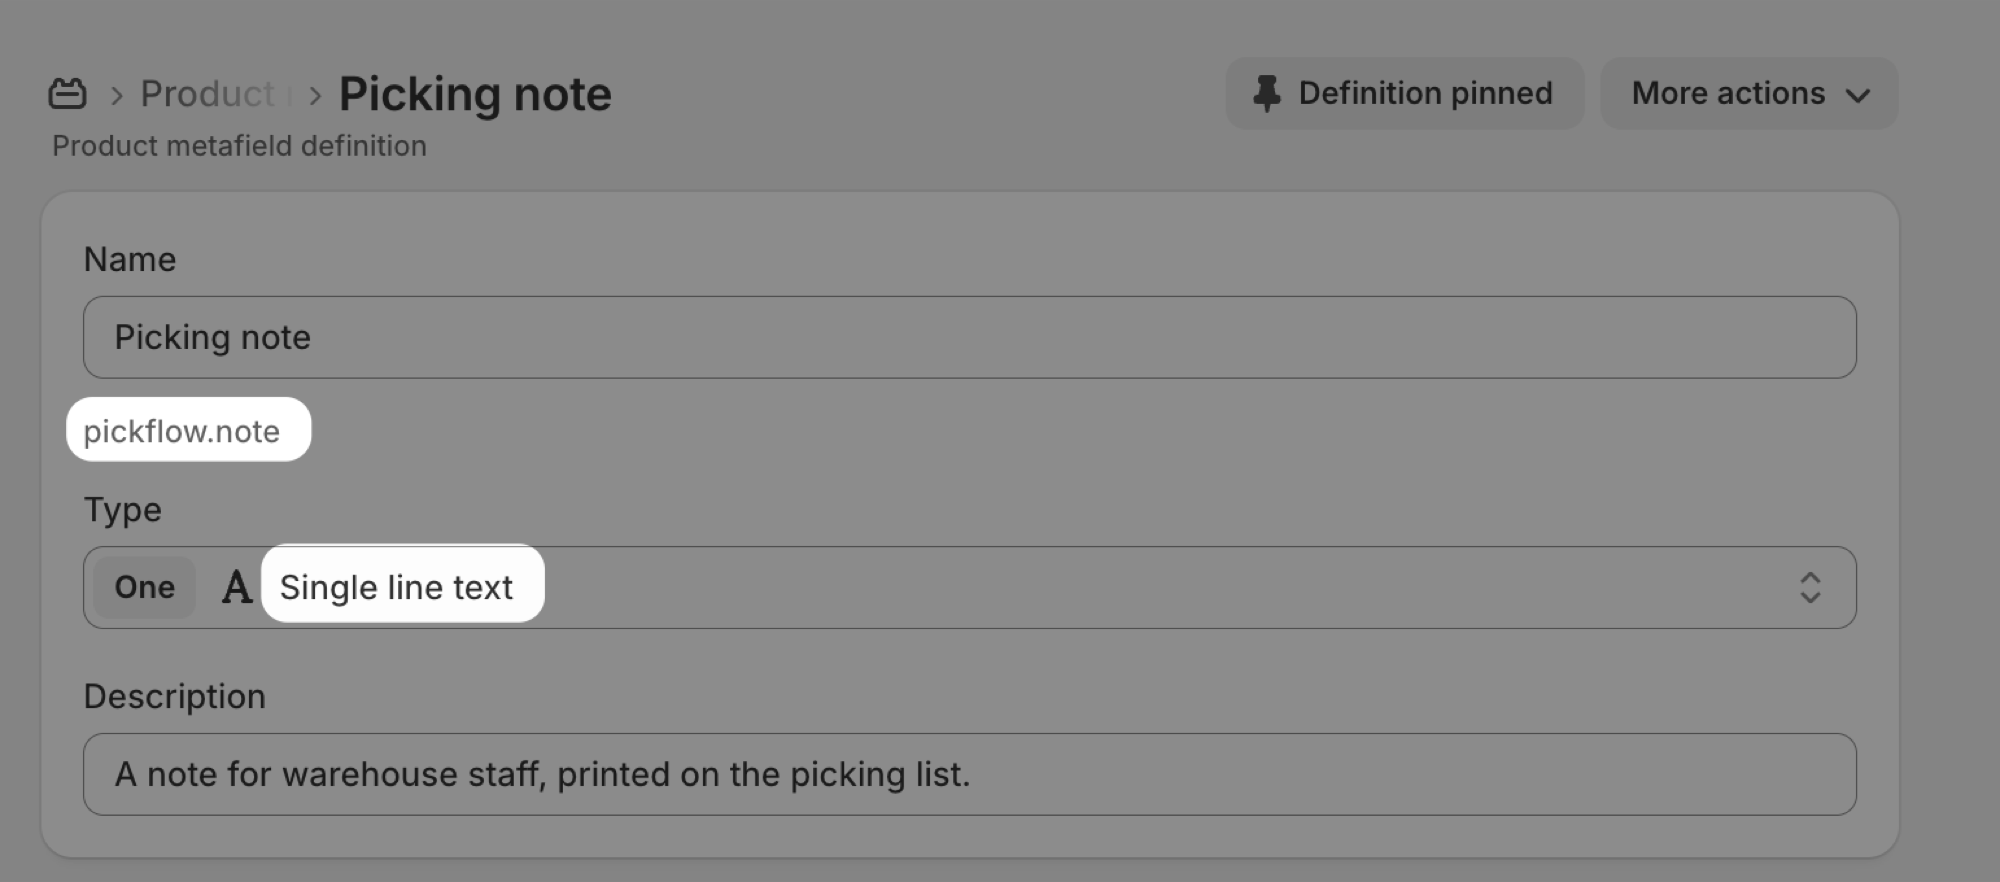
Once the definition exists, a named field appears on every product’s edit page. That is where you write the note for each product.
Here is what that looks like on a real order. On the Shopify order page, order custom attributes appear under Additional details on the right, and line item custom attributes appear under the product name.
Printed on the picking list, the three land in different places. Order custom attributes go together in the order information block; line item custom attributes and the product metafield go on that product’s row.
For example, entering this under “keys to show” for line item custom attributes
engraving_location=Engraving position
_engraving_color=Engraving color
prints “Engraving position: Center of the base” and “Engraving color: Gold” on that product’s row. Keys starting with _ never appear on the Shopify order page, but they do print once you list the key here.
Packing Slip Settings
The document that ships in the box.
- Store Information: store name, address, email, and phone shown in the packing slip header
- Thank-you message: the text printed at the bottom of the slip
- QR code: prints a QR code for a URL of your choice. Write
{{orderNumber}}in the URL and it is replaced with the order number - Fields: toggles for SKU, shipping method, barcode, order date, and product image
If you ship internationally, the International tab lets you set a separate store name, address, and thank-you message for those orders. Leave them empty and the regular values are used.
10. Plans and limits
The Free plan covers 50 picking completions per month and up to 2 workers. Once you hit 50, starting new pickings and scan-based completion pause. Orders already in progress can still be finished with the Check button on each item.
The Standard plan combines a monthly fee with usage-based billing and has no limit on completions or workers. You can see this month’s completions on the Plan & pricing page.
💡 No features are gated by plan. The only differences are the limits on picking completions and worker count.
11. If something does not work
- An order is missing from the list: fulfilled and cancelled orders are excluded, as are orders at locations you left out of Pickable Locations. Note that partially fulfilled orders still count as unfulfilled and remain in the list.
- A worker sees no orders: check that the order actually has a worker assigned.
- A worker cannot log in: the invite link may have expired, or repeated wrong PINs may have locked the account. Use Reissue link, Reset PIN, or Unlock from the actions menu.
- The camera will not start: the worker app must be opened over HTTPS, and the browser needs camera permission. If that does not fix it, tag the products for manual picking in Tag Settings: workers can then pick them with the Check button instead of scanning.
- Scan-based completion stopped working: you may have reached the Free plan’s 50 completions for the month. Check the count on the Plan & pricing page.
If none of this helps, contact us from the chat button at the bottom of any app screen.